


The Most Efficient Way To Store Winter Boots At Home And Work
October in Canada is the moment to get ahead of freeze and thaw season. If last winter left you with puddles at the door, salt stains on grout, and slippery entrances, this year can be different. The right storage turns melting snow into a non issue and keeps your space safer and cleaner, whether you manage a family mudroom or a busy clinic lobby.
What “efficient” winter boot storage really means
Efficiency is not just about stacking more pairs in a small space. The most efficient way to store boots controls water, salt, and gravel at the source, protects floors, speeds up drying, and scales with your traffic. For Canadian winters, that points to water managed racks with integrated channels that drain into a bottom reservoir. This design keeps the entry dry while allowing airflow around the footwear so it dries faster and lasts longer.
Common options, and where they fall short
- Boot trays and mats: Trays do catch water, which helps. Do boot trays prevent damage to floors? They can reduce damage to a point, but they collect a shallow lake that sloshes, turns murky with salt and grit, and easily overflows on busy days. Mats soak up moisture, which then lingers, creates odour, and leaves white salt rings on tile and hardwood.
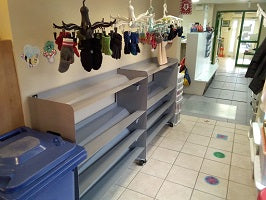
- Baskets and bins: Great for hiding clutter, not great for wet gear. Moisture gets trapped at the bottom, boots stay damp, and salt crystals abrade the materials. You trade a neat look for accelerated wear.
- Wooden racks: Wood looks warm, but it does not manage meltwater. Repeated wetting leads to swelling, staining, and warping. Without a reservoir, drips run to the floor.
- Open metal racks: Sturdy and airy, yet they still drip directly to the floor unless paired with liners or pans. Those add-ons need frequent emptying and do not channel water away.
Why water managed racks are the best way to store winter boots
What is the most efficient way to store boots? Choose a rack that actively manages meltwater. Rakabot’s approach uses integrated channels under each level that capture water, salt, and gravel as the boots thaw. The runoff flows into a bottom reservoir you can empty in seconds. The result is a dry, grippy floor with no surprise puddles, plus better boot longevity because salt and grit are contained rather than smeared underfoot.
Do shoe racks prevent shoe damage? Standard racks organise. Water managed racks protect. By lifting the boot soles off standing water and guiding runoff away, you limit salt saturation, prevent midsole breakdown, and reduce rust on eyelets and zippers. Adjustable levels and extenders let you avoid crumpling tall shafts, which also prevents creases and cracked leather.
Before and after, at home
Before: Four pairs of snow boots sit on a mat by the door. Afternoon sun warms them, the snow melts, and water spreads under the mat. By dinner, the tile is slick. By morning, white salt outlines dot the grout.
After: A water managed rack holds the same four pairs, plus two extra for guests. Meltwater travels through channels into the bottom reservoir. The entryway stays dry and safe. You lift and empty the reservoir during evening cleanup, then wipe once. The floor looks the same in March as it did in October.
Where to put a shoe rack at home? Aim for the main entry used with wet footwear. Place it on a level surface just inside the exterior door, with enough clearance to open the door fully and room to stand and remove boots safely. If you have a secondary entrance for sports gear or a garage door, consider a second unit there to keep slush from migrating through the house.
If you also need seating, an entry bench can help. For ideas that combine seating with drip control, browse entryway storage to map out hooks, shelves, and a rack footprint that fits your space.
Before and after, at work
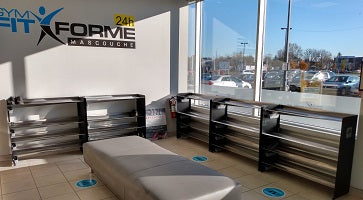
Before: A clinic sees 30 pairs of winter boots before lunch. A stack of trays fills with grey meltwater. Staff mop between patients and set out caution signs.
After: A modular, water managed rack spans the vestibule. Channels and reservoirs capture runoff throughout the morning. Staff roll the unit forward to clean, then empty reservoirs on a schedule. Patients enjoy a clean, grippy entrance with no lingering odour, and maintenance time drops.
Where to put a shoe rack in commercial spaces? Position it where traffic naturally pauses. For clinics and offices, the vestibule or reception alcove works best. Keep pathways clear, leave ADA or barrier free access unobstructed, and use end caps or signage so visitors know where to place footwear. If you need mobility for cleaning or reconfiguring layouts, consider shoe racks with wheels to make daily maintenance faster.
Sizing your setup, from families to clinics
- Families and shared homes: Start with a two to three level rack that fits 6 to 10 pairs. Add modular extenders as winter gear multiplies with kids’ sizes or guests. Adjustable levels let you raise the top tier for tall snow boots without squashing shafts.
- Mudrooms and multi family entries: Plan one pair per household member, plus 30 percent buffer for guests and wet days. Two units side by side often fit a standard mudroom wall and keep drop zones organised.
- Clinics and offices: Count peak hour traffic, not daily totals. For example, if 20 visitors arrive within 30 minutes, size for at least 20 pairs, plus a buffer for staff footwear. Opt for longer runs with consistent tier spacing, or split into two shorter units on either side of the vestibule to spread traffic and reduce congestion. Add caster kits where nightly floor scrubbing is required.
- Tall and bulky boots: Use adjustable levels and height extenders so tall boots stand upright. This improves airflow and prevents fold lines that can crack when frozen.
Maintenance that takes minutes
An efficient system should be simple to maintain. With water managed racks, daily care is quick.
- Empty reservoirs during or after peak traffic.
- Rinse channels and trays as needed; salt and gravel will collect there, not on your floors.
- Wipe surrounding floors once, not hourly.
- Inspect extenders and fasteners at the season start, then monthly.
This light routine keeps the entrance dry and cuts cleaning labour.
Safety and longevity benefits you can feel
Dry floors reduce slips. Captured grit stays out of floor finish, so laminate keeps its sheen and tile grout avoids white rings. Boots dry faster because air can circulate on all sides, which fights odour and mildew. Over the season, that means fewer ruined mats, less time mopping, and happier visitors.
Quick answers to common questions
- What is the best way to store winter boots? Use a water
managed rack that captures meltwater in a bottom reservoir, with adjustable levels to fit tall boots. - Do shoe racks prevent shoe damage? Racks with water management help prevent damage by keeping boots out of standing water and away from salt deposits. Standard open racks organise, but they do not protect against moisture.
- Where to put a shoe rack? Place it at the main wet entry, on level flooring, with enough clearance for doors and safe movement. In commercial spaces, use vestibules or reception alcoves that naturally slow traffic.
- Do boot trays prevent damage to floors? Trays help, but they hold pooled water that overflows and spreads salt. A reservoir based system goes further by containing and isolating runoff.
Ready for freeze and thaw season
Pre winter prep pays off. Choose storage that manages water, not just clutter. If you are updating a home entry, compare configurations in our shoes rack to find a fit for your space. Planning a clinic or office layout for higher traffic? Rolling options like shoe racks with wheels make cleaning and reconfiguration simple.
Want tailored guidance on sizing, stackable configurations, and adjustable levels for tall snow boots? Contact us for layout advice and fast shipping across Canada. Your entrances can stay dry, safe, and welcoming all winter.