 | 10x Design Awards Winner | 📞


Commercial Entryways In Winter: A Floor-Saving Boot Rack Plan
Winter in Canada is tough on entryways. Meltwater, salt, and grit follow every step inside. If you manage a clinic, office, gym, or retail space, you know the routine: wet floors, slip risk, scuffed finishes, and constant
mopping. This post gives you a turnkey plan to control the mess using traffic assessment, smart zoning, and commercial boot racks with sealed reservoirs and modular expansion. You will see how to lay out your space,
where to place racks, how to clean faster, and why this approach pays for itself quickly.
Start with traffic assessment
You do not need sensors or a PhD. Count pairs per hour during peak times for three days, then average.
- Under 40 pairs per hour: low to moderate traffic, typical of small clinics and boutiques.
- 40 to 120 pairs per hour: moderate to high traffic, common for busy offices and fitness studios.
- 120 plus pairs per hour: heavy traffic, think community centres or multi-tenant lobbies.
This number drives rack capacity, aisle widths, and how many reservoirs and expansion kits you will need. As a rule of thumb, plan one shelf position for every expected pair entering within a 10 to 15 minute window, plus a 25 percent buffer for overlap during class changes, shift changes, or appointment clusters.
Zone your entry: wet, drip, clean
Think of your entrance as three short zones arranged from door to interior. Here is a simple word sketch you can imagine on a floor plan.
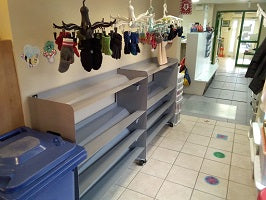
- Wet zone, first 2 to 3 metres from the door: heavy-duty scraper mat flush with the threshold, then your first line of commercial boot racks. This catches the worst slush and salt immediately so it never reaches tile or wood.
- Drip zone, next 2 to 4 metres: additional racks with integrated reservoirs and space for umbrellas. This is where boots keep draining while users move inward in clean footwear.
- Clean zone, beyond 4 to 7 metres: benches, lockers, and reception. Floors should remain dry so guests get a solid first impression.
If you only have a compact vestibule, compress the wet and drip zones, and stack vertically to preserve egress width.
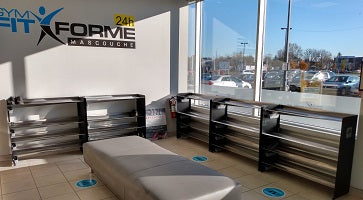
Specify the right commercial boot racks
Flat mats and trays collect water but do not move it away from the tread surface, so boots sit in a cold bath. A commercial boot rack with sloped tiers and a sealed reservoir channels meltwater downward into a container that you can empty safely. This speeds drying and keeps floors dry.
Look for these features:
- V-shaped, sloped shelves that guide water to drainage channels.
- A sealed bottom reservoir with a removable container that prevents puddles and salt spray.
- Ventilation gaps around treads to reduce odours and speed drying.
- Stackable frames and extenders for vertical growth without taking more floor space.
- Expansion kits and adjustable shelf heights for mixed footwear, from sneakers to tall winter boots.
- Optional rolling kits for quick reconfiguration and cleaning.
If mobility matters for your cleaning crew, consider shoe racks with wheels or rolling shoe racks kits that lock in place during the day, then roll out at night for a quick mop.
Layout diagrams described in words
Here are three common footprints and how to kit them.
- Narrow corridor, 1.8 metres wide by 6 metres long: place a single line of commercial boot rack modules along one wall starting 1 metre past the door. Keep a continuous 1.1 metre clear path for egress. Stack to two or three levels with tall-boot clearance on the bottom tier. Insert a 60 centimetre gap every 3 metres as a passing bay.
- Square lobby, 4 by 4 metres: create a U-shaped rack island 1 metre inside the door with the opening facing reception. Each leg of the U is 1.2 metres long, leaving 1.2 metres of clearance all around for circulation and emergency exits. Place a scraper mat at the door; add drip mats only under the island, not extending into the walkways.
- Vestibule, 2 by 2.5 metres: mount two stacked modules on the hinge side of the door to avoid swing conflict. Maintain 90 centimetres clearance from the door sweep. Use adjustable shelves for mixed footwear and a compact reservoir that empties without removing the unit.
Always check local fire and building codes. As a baseline, maintain 1.1 metres minimum egress width to exits and stairs, and never place racks where they can block door swing arcs or access panels.
Cleaning workflow that cuts slip risk and time
A good workflow is simple, repeatable, and fast.
- Midday quick cycle, 5 to 8 minutes: empty reservoirs before they reach two thirds capacity; spray racks with a neutral cleaner; wipe channels with a microfibre cloth; check for salt build-up on the front lip and clear it with a plastic scraper.
- End of day deep cycle, 12 to 15 minutes: roll racks forward if mobile, or lift the front slightly to pull debris to the channel; vacuum grit; empty and rinse reservoirs with warm water; dry with a towel to reduce overnight odours; mop the floor under and around the units. Refill a spray bottle for next day.
- Weekly, 20 minutes: inspect caster locks, shelf screws, and extenders; replace any worn feet; record reservoir volumes to fine tune midday emptying frequency.
This routine reduces slip risk, keeps air fresher, and saves your janitorial team from constantly chasing puddles.
Where not to put a shoe rack
Do not block emergency egress, fire panels, or accessibility routes. Avoid placing racks in a door swing path, in front of baseboard heaters, or under forced air vents that can drive moisture across floors. Keep at least 90 centimetres from reception desks to prevent splashing onto electronics, and do not place racks on uneven floors that prevent proper drainage to the reservoir.
Do boot trays prevent floor damage?
Trays help, but they have limits. A flat tray keeps water off the floor, yet the top surface stays wet. Boots keep leaking onto that surface, then users track moisture beyond the mat. Trays also overflow during peaks and can warp. A commercial boot rack with an integrated reservoir moves meltwater away from the tread surface, contains higher volumes, and prevents dripping from upper levels onto lower footwear and floors. That is how you
avoid salt bloom on grout lines and finish failure on wood or laminate.
What is the most efficient way to store boots, and how to organize them
Efficiency comes from vertical density and dry-down. Use adjustable shelves, tall-boot clearance on lower tiers, and shorter spacing above for shoes. Group by footwear height and by time of day. For example, set the first module for guests, with clear labels and open fronts, and reserve a second module for staff with set positions. Keep toe-to-heel alternating to increase capacity by up to 20 percent. Pair this with a simple sign at the door
that guides users to remove wet boots in the wet zone and switch to indoor shoes before moving to the clean zone.
Average lifespan of a shoe rack in commercial use
Quality commercial racks built with durable finishes and sealed reservoirs typically last 5 to 10 years in daily use when cleaned and inspected regularly. Mobile parts like casters and adjustable hardware may need replacement sooner depending on traffic. Plan for light maintenance and occasional part replacement rather than full unit replacement.
Quick ROI snapshot
- Fewer floor repairs: sealed reservoirs stop water and salt from reaching grout, laminate seams, and baseboards. Budget 20 to 40 percent fewer finish touchups over winter seasons.
- Fewer slip incidents: controlled wet and drip zones, plus faster drying, reduce near misses and reportable slips.
- Better first impressions: organised entryways, no puddles, and cleaner air from drier boots help patients, clients, and members feel confident.
Add up the avoided labour hours, reduced incident risk, and extended flooring life, and commercial boot racks pay back quickly, often within one winter season in moderate to high traffic sites.
Sizing and expansion tips
Start with modular units sized to your peak 15 minute inflow, then add extenders as you observe real demand. Stack vertically first to protect egress width. If you need mobility for cleaning crews or multipurpose rooms, consider shoe racks with wheels to convert a fixed line into a roll-away island without sacrificing capacity.
Final checks and a quick consultation
A winter-proof entryway is not about more mopping. It is about smarter flow and gear that manages water at the source. Assess traffic, zone your footprint, specify racks with sealed reservoirs and stackable frames, and adopt a simple cleaning loop. Your floors, staff, and visitors will notice the difference.
If you want help sizing and laying out a commercial boot rack system for your space, book a consult with our team. We design, ship, and support configurations across Canada, and we can match your traffic and footprint with a scalable plan that works from the first snowfall to the spring thaw.
Optional resources if you are comparing solutions: explore a commercial boot rack option built for water management, or look at an entryway organizer approach if you also need shelving and accessory storage